 This handy Contractor’s Guide will explain the basics to produce high-quality colored concrete. The Guide shares “Tips of the Trade” that are more specific to colored concrete, not to provide a complete guide to concreting. See the back page for sources of more information about general concrete practices.
Together with the techniques you already know, tools you already have, and without license fees, Davis Colors and your Ready Mix dealer can help you stake a claim for more jobs and higher profits with colored concrete.
Consistency — the Key to Success
Consistency in materials and craftsmanship is the key to color uniformity. Follow the tips described in this guide, allow extra time for placement and finishing and above all, finish evenly and with care for beautiful colored concrete.
How to Order
Your favorite Ready-Mix supplier is probably a Davis dealer. If not, tell them to get with it! Concrete can be ordered from a Davis dealer with any of 25 standard colors already mixed in. For custom colors or specified colors, your Davis dealer can call upon Davis Colors to match almost any color your customer desires. To locate your nearest Davis Colors dealer click here, or call (800) 638-4444 (East), (800) 356-4848 (West) or (323) 269-7311.
Adding Davis Colors™ Yourself
While it’s easiest to order concrete with colors already mixed-in, sometimes it makes sense to add them yourself. Davis Colors in Mix-Ready®disintegrating bags make it clean and easy to do. Just toss unopened Mix-Ready® bags directly into the concrete mixer. Mix-Ready® bags travel deep into the mix and disintegrate under mixing action, releasing pigments to disperse uniformly. You’ll stay cleaner and there won’t be a bunch of empty bags to clutter the job site.
Follow mixing instructions printed on the bag or request a Mix-Ready® data sheet from your dealer. Davis Colors™ are added by weight in proportion to the content of cement in each cubic yard. Calculate the mix requirement and add the corresponding weight of Mix-Ready® bags. Mix at charging speed for at least five minutes (10 minutes for pea-gravel mixes).
Jobsite Guidelines
Weather
Remember, “Consistency is Key”. Even weather conditions have to cooperate:
- Schedule placement and finishing work to minimize exposure to hot Sun before curing materials can be applied. Postpone color concreting until windy conditions pass. Don’t concrete if rain, snow or frost is in the forecast. Click here for the weather forecast.
- Dark or black-colored concrete will be exposed to additional heat in sunny, dry conditions. Provide extra curing protection to prevent thermal cracking.
- Concrete made from the same supplier can cure to different colors if pour and curing takes place under different climates. Concrete temperature should be maintained between 60°F and 80°F in most applications for proper hardening to occur during the crucial first days. Temperature also affects the amount of water required to make the mix workable. It takes less water at low temperatures to get a workable mix. Variations in water-cement ratio have a corresponding effect on concrete color.
Mixing
“Consistency is Key” with Mixing too:
- Trucks should be scheduled for consistent mix times from plant until discharge. Allow no more than 11/2 hours. The shorter, the better.
- Specify a 4″ slump. Slump greater than 5″ should definitely be avoided unless a water-reducing or super-plasticizing admixture is added by the concrete supplier. Low water content (water-cement ratio) minimizes shrinkage and cracking, maximizes hardness and promotes a richer, darker color.
- Specify air content range of 5 to 7% for improved workability and durability. (In mild climates, this may be overkill- check with supplier)
- Specify the largest size of coarse aggregate usable to keep water content low. Get the supplier’s assurance they are non-reactive.
- Don’t allow the addition of Calcium Chloride set accelerator. It causes discoloration.
Subgrade
Consistency applies to the Subgrade which has to support the weight of the slab and any load placed on it.
- Subgrade must be uniformly graded, compacted and dampened so it won’t absorb mix water from the concrete, but no standing water, hard or soft spots, ice, frost or muddy areas.
- Add a 2-3″ layer of sand, gravel or crushed stone and compact with vibrating equipment.
- Grading should be sloped so that water drains away from the slab.
- If a vapor barrier is used, a layer of damp sand should be placed over the barrier to minimize risk of cracking. Overlap sheets and tape any holes in the barrier.
Forms and Reinforcement
For slabs, formwork should be positioned to achieve uniform thickness. American Concrete Institute (ACI) standard guidelines for reinforcement and joint placement should be followed to control cracking.
Placing
- Prevent segregation of mix ingredients. Place concrete near its final location and move it with shovels. Don’t move by vibrating.
- Protect adjacent slabs and structures from splatters with plastic sheets.
- Do not add water to mix at job site or into pump or onto tools or brooms.
Finishing
Consistency in finishing pays off big in quality colored concrete. The wide variety of finishes you can apply shows off your craftsmanship and commands a premium for your extra effort. For color uniformity, remember:
- Bull float after striking off the slab. Skip jitterbugging (tamping), unless slump is 1 inch or less. For most finishes, use wood bull floats and darbies, not magnesium.
- Wait for bleed water “sheen” to disappear BEFORE starting floating and troweling.
- DO NOT OVER TROWEL or start troweling late. This leads to burns and dark spots.
- Do not sprinkle the surface with cement or with Davis Colors or pigments meant for integral coloring.
- Don’t fog the colored concrete with water or add water to tools or brooms. Adding water causes the surface to pale or discolor.
- A broom, rotary or textured finish will produce optimum color uniformity. A super-hard, dark, slippery-smooth finish is made by extended troweling. Trowel With Care! The potential for discoloration (darkening) rises as troweling time increases. The easiest way to uniform color is to skip troweling; just float and broom or use swirl finish. Follow with effective curing. Screed finishes also work well.
- For more information on creating these finishes, see Finishing Concrete Slabs with Color and Texture by the Portland Cement Association.
Selected Finishes
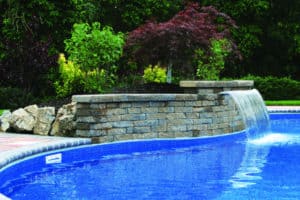
Broomed – Made by pulling special brooms across stiff, freshly floated or troweled surface. For variety, broom texture can be heavy or light, or in straight or wavy lines.
Exposed Aggregate – Aggregate is exposed by “seeding the fresh concrete with aggregate, or spraying a surface set-retarding compound scrubbing cement “paste” from the surface of concrete. If retarders are used, exercise caution and follow manufacturer’s instructions explicitly. Aggregates can be colored or sparkling, fractured or smooth.
Mechanically Abraded – Aggregate can also be exposed by removing the surface cement “paste” by using a high pressure water wash, sand blasting, grinding, or bush-hammering. Exposure level can vary from barely revealing fine aggregate (“brush”) or up to 1/3 the diameter of coarse aggregate (‘heavy”).
Salt Pocked -Rock salt is pressed into the surface after finishing. After 24 hours, the salt is washed away with water and a brush. Remove all traces of salt. Allow surface and pockets to dry before applying curing compound. Finish is not recommended in cold areas where water could collect and freeze in pockets.
Stamped – A powder release agent or plastic sheet is placed on the colored concrete surface after floating. Special stamping tools are pressed into the concrete to create a pattern and then removed. Follow recommendations of stamping tool manufacturer.
Form Liners – Form liners allow endless design possibilities for texture, pattern, and relief. They are available in a wide range of standard patterns and well as custom designs. There are more considerations in vertical formwork. Consult a Davis dealer or request a Davis Colors Specifier’s Data Sheet for information.
Vertical Form Work
Formed Surfaces: Sandblasting, high pressure water jet, bushhammering, and surface retarders can be brush, light, medium or heavy depending on texture. For more information see Color and Texture in Architectural Concrete, Portland Cement Association Publication SP021.
Patching Colored Concrete: Fill holes and defects in formed concrete surface within a few days after form removal. This allows patches and surrounding concrete to age together and reduces the possibility of color variations.
Use the same patching materials and techniques that were approved on mock-up. Make patches with materials from the same sources as the concrete. Because the stiff mortar used for patching typically has a lower water/cement ration than the rest of the concrete, it will normally dry darker. To overcome this, white cement should be added to the mortar mix. Determine mix proportions by trial and error; a good starting mix is 3 parts sand, 1 part gray cement, and 1 part white cement. Add enough color to create the same color/cement mix rate used on the job, but the white cement used to lighten the patch should not be included when figuring the color/cement mix rate for patching. If necessary, add aggregate to mortar mix so patches will have the same texture and appearance as adjacent concrete.
Curing
Curing is one of the most important and often the most neglected aspects of quality concrete construction. Uneven curing = uneven drying = uneven color. Poor curing contributes to shrinkage cracks, dusting and surface deterioration.
- Apply curing compound as soon as the surface will not be damaged by the application. (Salt finish is an exception.)
- If sawcutting is used for control joints, it should take place before application of curing materials. Thoroughly rinse all cutting residue off the slab to prevent stains.
- Curing with water sprinkling, membranes, paper, Sodium or Fluro silicate-type hardeners and non-approved compounds can cause discoloration. Plastic sheets, wood, sand and other materials left on colored concrete will also cause discoloration. If water is used to cure, it must be fogged using spray tips made for this purpose. Water must be clear and free of salts, and fogged using spray tips made for this purpose
A Note on Efflorescence
Efflorescence is a salt deposit that forms on the surface of concrete, masonry, clay brick and porous stone. It causes unsightly white stains which can be particularly objectionable on colored concrete. Efflorescence forms when water migrates through concrete, dissolves soluble compounds (calcium hydroxide) and evaporates leaving the solids on the surface. Water, concrete permeability and soluble content determine how much and when efflorescence will occur.
Control efflorescence by mixing with low water/cement ratio, use curing compound and design for less permeability. Seal against water and stop leaks. Keep de-icing salts away. Efflorescence is easy to remove with water wash if caught early. If not, it converts to calcium carbonate which is removed with a dilute acid wash that will affect the surface appearance.
More Information: For more information on all aspects of good concrete construction contact:
- Portland Cement Association (708) 966-6200
- National Ready Mix Concrete Association (301) 587-1400
- American Concrete Institute (313) 532-2600
- Concrete Construction Publications (708) 543-0870
Continuing Education
For a FREE continuing education 1 hour credit course on Concrete Colors click on the continuing education icon.